This section of the lone worker knowledge base will cover:
Logging Into SafetyAware
- Login Screen - what is it?
- Login Screen - how to
Signing Into Safety Aware
- Main Screen - what is it? (not monitored)
- Main Screen - what is it? (monitored)
- Main Screen - how to
SafetyAware Modes
- Assist Mode - how to
- Hazard Mode - how to
- Emergency Mode - how to
Watch the SafetyAware Lone Worker Tutorial on video
Watch the video
Login Screen - what is it?
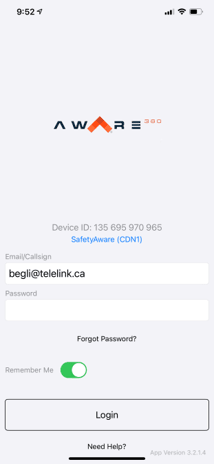
- Device ID: The ID of your device, this information is helpful when doing technical troubleshooting.
- Email/Callsign: The email or callsign you use to login. Generally, this is an email, but some organizations may use a callsign.
- Password: The password you set to login to the app via a welcome email.
- Forgot Password: This allows someone to send themselves the set password email and reset their own password.
- Remember me: Using this toggle you can save your credentials so future logins only require pressing login.
- Login: The button to press to login to the SafetyAware app.
- Need help: This is a direct link to the Aware-hosted knowledge base which provides useful technical information for troubleshooting.
Login Screen - how to
To login to your SafetyAware app:
- Open the app and navigate to the login screen.
- Enter your email.
- Enter your password.
- Press the login button.
Main Screen - what is it? (not monitored)
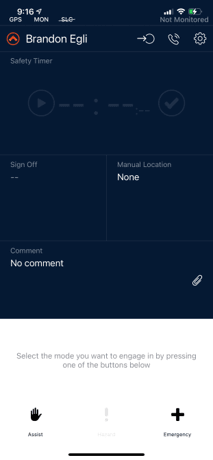
- GPS: Your active GPS connection for accurate location reporting (see top left of image)
- MON: Your active cellular connection to the monitor centre.
- SLC: If applicable, your active connection to your Bluetooth Safetylink companion emergency band.
- Sign On: the button used to sign on to an actively monitored session.
- Monitor Center Phone Number: The button used to directly call a 24/7/365 agent in the monitor center.
- Preferences: The button to access your preferences menu.
- Safety Timer: Your current safety timer (the time remaining before you must check-in)
- Sign Off Timer: The sign off time you have set as your end of an actively monitored session.
- Manual Location: This is utilized to update your manual location in the event you may have poor GPS, you can input a manual location and still check-in.
- Comment: This area allows you to add a comment to send through to the monitor centre as additional context when checking in, setting a hazard, etc.
- Attachments: This allows you to attach an image, video or file to send through the monitor centre as additional context.
- Assist: Utilized to set the Assist mode, classified as a non-medical emergency.
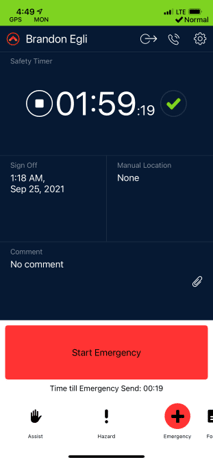
- Emergency: Utilized to send an Emergency and request immediate assistance. Activating this mode enables a 20-second countdown in which time you can cancel sending an Emergency. Letting the 20-second countdown expire will send through an Emergency. Alternatively, when activating Emergency mode, the red Start Emergency button that appears can be pressed to immediately send an Emergency.
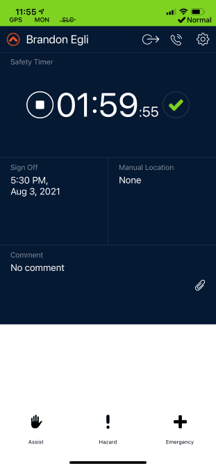
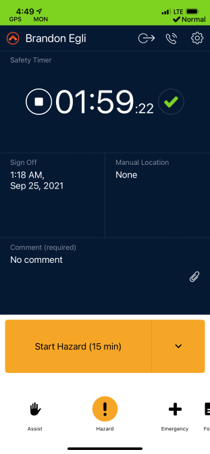
Main Screen - what is it? (monitored)
- GPS: Your active GPS connection for accurate location reporting.
- MON: Your active cellular connection to the monitor centre.
- SLC: If applicable, your active connection to your Bluetooth Safetylink Companion emergency band.
- Sign On: The button used to sign on to an actively monitored session.
- Monitor Center Phone Number: The button used to directly call a 24/7/365 agent at the monitor centre.
- Preferences: The button to access your preferences menu.
- Safety Timer: Your current safety timer (the time remaining before you must check-in).
- Sign Off Time: The sign off time you have set as your end of an actively monitored session.
- Manual Location: This is utilized to update your manual location in the event you may have poor GPS, you can input a manual location and still check-in.
- Comment: This area allows you to add a comment to send through to the monitor centre as additional context when checking in, setting a hazard, etc.
- Attachments: This allows you to attach an image, video or file to send through the monitor centre as additional context.
- Assist: Utilized to set the Assist mode, classified as a non-medical emergency.
- Hazard: Utilized to set Hazard mode, generally this is set when an individual is going into a situation that may pose more hazard to them and allows for a shorter timer to be set to be actioned in the event something does occur.
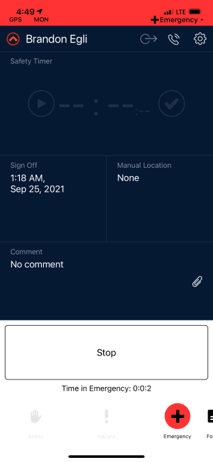
- Emergency: Utilized to send an Emergency and request immediate assistance. Activating this mode enables a 20-second countdown in which time you can cancel sending an Emergency. Letting the 20-second countdown expire will send through an Emergency. Alternatively, when activating Emergency mode, the red Start Emergency button that appears can be pressed to immediately send an Emergency.
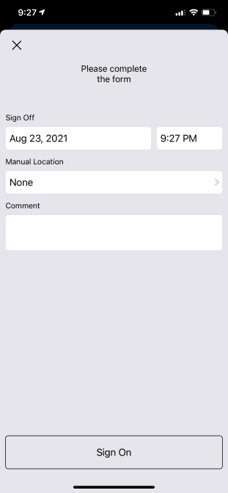
Main Screen - how to
- Ensure the date of sign off is correct.
- Choose the time you expect to conclude your monitored safety session.
- Add any context comments you would to be attached to this monitored safety sessions (optional step)
- Press the Sign On button to being your monitored safety session.
- If you receive a message regarding a inaccurate GPS location, you can still sign on by adding your manual location here. Once your GPS normalizes it will take the accurate GPS position for updates and check-ins.
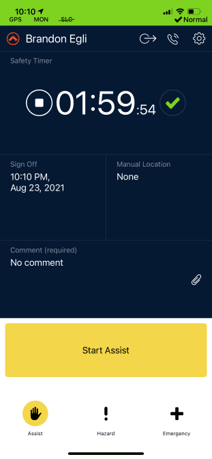
Assist Mode - how to
- Select Assist mode at the bottom of your screen
- Add a comment in the comment section that will provide some context of the assist that is being requested.
- Press “Start Assist” to send through the assist to the monitor centre.
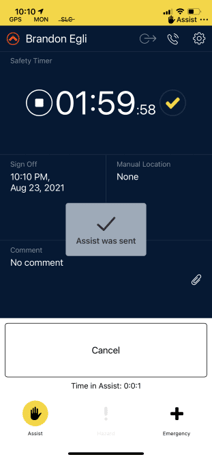
- Once the assist has been received you will see that feedback on the app in the top right.
- An agent will then follow your organizations assist escalation plan.
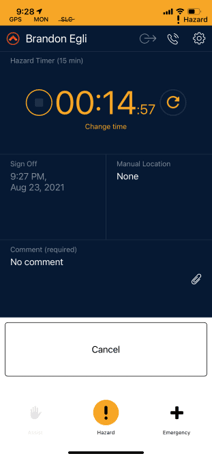
Hazard Mode - how to
- Select Hazard mode at the bottom of your screen.
- Add a comment in the comment section that will provide some context of the possible hazards that could be present during this time.
- Press “Start Hazard” to send through the assist to the monitor centre.
- When the hazard mode is no longer required, press the cancel button to return to the normally monitored mode.
Emergency Mode - how to
- Select Emergency mode at the bottom of your screen
- There is a 20-second timer that will begin to countdown. Selecting Emergency mode again will cancel the emergency without sending anything through to the monitor. Allowing the timer to countdown to zero will send through an emergency.
- Alternatively, you can press Start Emergency to send through an emergency right away.
- Pressing stop will cancel or end an emergency but be aware that an agent may follow up to ensure the users' safety and ensure there is no emergency.