This section of the lone worker knowledge base will cover:
SafetyAware Control Centre Home
- Home - what is it?
Assets
- Assets - what is it?
- Assets - how to
Broadcast Messaging
- Broadcast Messaging - how to
Asset Groups
- Asset Groups - what is it?
- Asset Groups - how to
Escalation Plans
- Escalation Plans - what is it?
- Escalation Plans - how to
Users
- Users - what is it?
Clients
- Reminders -how to
Watch SafetyAware Control Centre demonstration on video
Watch the video
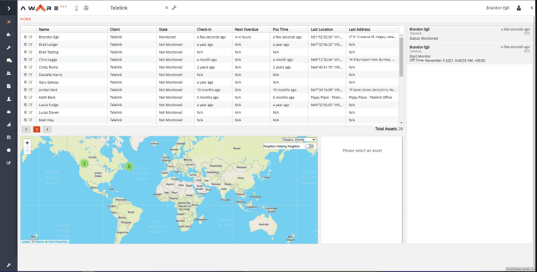
Home - what is it?
- Search Bar: This function allows you to search through your asset/users lists on any page within Control Center.
- Profile/Preferences: From this drop-down an administrator can access their profile settings as well as preference settings for their own login. An example of this would be setting your current time zone.
- Asset List: A list of your current monitored/not monitored assets with important information such as their location or last check-in time.
- Activity Feed: This showcases live activity updates of assets that are online and monitored.
- Map: A map with current location of online monitored assets..
- Dashboard Content Toggle: This allows an administrator to toggle what live data is visible on the home screen. This can range from alarming assets only to monitored and not monitored assets.

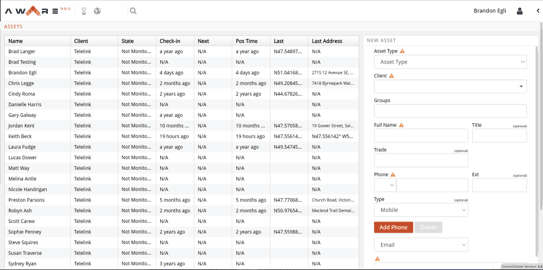
Assets - what is it? (pt.1)
- Asset List: A selectable list of all your assets (enabled and disabled) within Control Center
- Asset Type: This should always be set to person.
- Groups: This allows an asset to be added to any preexisting Asset Group.
- Type: This denotes what kind of phone the associated phone number belongs to.
.
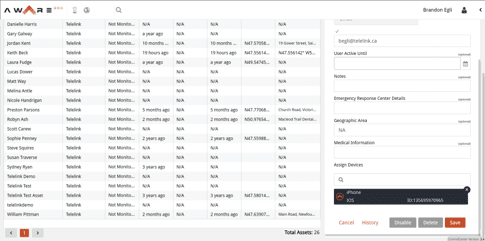
Assets - what is it? (pt. 2)
- Notes: This field is an additional area to add any notes or information unique to the asset that the organization would like to be available to an agent should an event occur.
- Emergency Response Center Details: This is a field that allows any additional details or instructions for Emergency Response agents.
- Geographic Area: This function helps to group assets together on any automated e-mail reports that get received.
- Medical Information: This field is to provide any medical information an asset is comfortable with sharing in the event of an emergency and the agent can pass this information on to emergency services ahead of time.
- Assign Devices: This field allows you to search for a satellite device for assignment to an asset. You can search for the device by its unique name or IMEI number.
- History: This allows an individual with administrative access to view and export an audit history of an asset’s online monitored sessions.
- Disable: This allows an administrator to put an asset in a suspended state. Should the asset remain in a suspended state beyond the next bill cycle they will not count towards the monthly billing of assets. Once enabled again they will immediately start counting towards the overall asset count. While in a disabled state the asset cannot login or utilize the SafetyAware service. Once enabled again they will gain full functionality immediately.
- Delete: This allows an administrator to permanently delete an asset and all accompanying information from the Control Center database.
- Save: This function is to be utilized anytime a change or update is made to any asset profile.
Assets - how to?
- First, make sure no asset is selected from the Asset List
- This should prompt the New Asset box on the right side of your screen.
- Fill in the required information denoted by an orange triangle with an exclamation mark.
- Press add at the bottom of the New Asset box, you may have to scroll to find it.
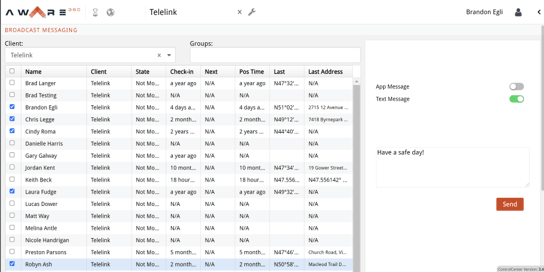
Broadcast Messaging - how to
- If you have created groups within your client, you can select a group here if you want to send a message to a specific group.
- Select specific assets or all assets from the currently shown group.
- Toggle on whether you would like to send the Broadcast Message as an App Message, Text Message or both.
- Type the content of your Broadcast Message here.
- Press send.
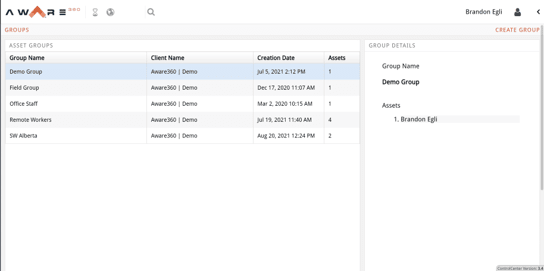
Asset Groups - what is it
- Create Group: This feature allows you to create an Asset Group. Asset groups are used in conjunction with the Broadcast Messaging Feature for a quick and simple way to send a broadcast message to a specific group of assets.
- Asset Groups: This is the list of currently created Asset Groups within your client Control Center portal.
- Group Details: When an Asset Group is selected, this shows the details of that specific group such as the name and which assets belong to it.
Escalation Plans - what is it?
- Check-In Settings: Setup individual check-in timers, time of day timers, and in motion timers.
- Escalation Contacts: Select the escalation contacts that will be contacted in the event of any escalation.
- Automatic E-mail Notifications: Automatic e-mail notifications can be setup based on specific events or alarms and can go to any e-mail address. Multiple different combinations of automatic e-mail notifications can be setup for different recipient groups.
- Form Name: This area allows you to name your specific version of escalation plan assign as well as any additional notes.
- Save: Save and apply the escalation plan to an asset that will be actioned by an agent upon a missed alarm or event
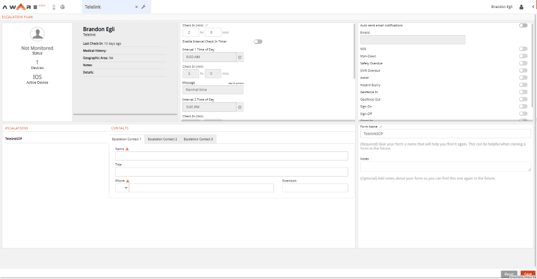
Escalation Plans - how to
- Input the specific amount of time for each timer for the selected asset. This includes the check in timer, time of day timer (if utilized) and the in-motion timer.
- Select the escalation contacts who need to be a part of any escalation for this asset. This may be either free form as seen in the example here or from a drop-down menu with prepopulated escalation contacts from your organization.
- If desired turn on the automatic e-mail notifications and setup who will receive the e-mails for specific events of the selected asset.
- Add any additional notes or name of this escalation plan for the selected asset.
- Press save to apply the new plan setting to the asset.
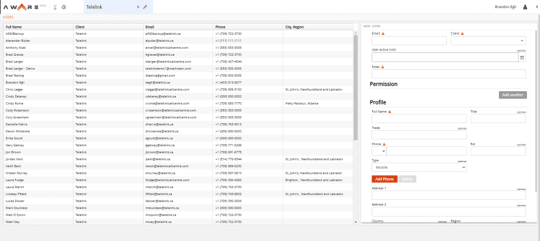
Users - what is it?
- User List: A selectable list of all your users within Control Center.
- Client: Select your organization from this drop down.
- Roles: This area is where certain permissions are handed out to individual users allowing different levels of access to Control Center.
- Type: This denotes what kind of phone the associated phone number belongs to.
- Address: An optional field to capture a users address
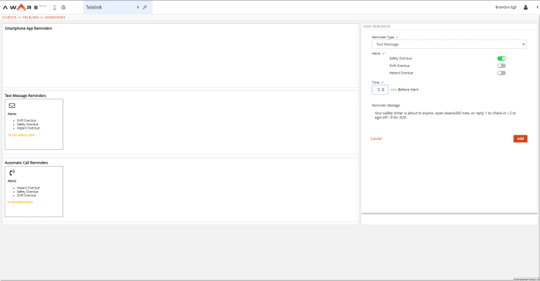
Reminders - how to
- Choose the type of reminder to setup for your organization.
- Choose a single or multiple alert types the alarm will apply to.
- Choose the amount of time before the specified timer expires the reminder should be sent. You can see the specifics of what the reminder will say in detail below.
- Press Add to set the new reminder that will apply to all assets within Control Center.
- Once a reminder is setup it will appear on the left-hand side of the screen in the respective reminder category that was selected.